Biomedicum Imaging Unit Faculty of Medicine |
|
|
Contact information _______________________
5th floor office, room B501a 1st floor office, room B117a Biomedicum Helsinki
BIU web site: |
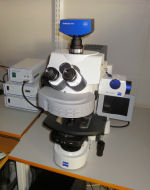
Zeiss AxioImager.Z1 upright epifluorescence microscopes with Apotome (AxioImager 3)
Technical Information
Instrument use General Information If you would like to start using the AxioImager, please go to our Fees and user information pages for instructions for new users. When you receive your user training, you will be automatically added to the Axio Imager microscope users mailing list. Please read those e-mails to know what is going on! If you need fluorescence (mercury) lamp and it is not on, first check in the paper calendar at what time it was turned off - remember that there has to be at least 30 min. gap between switching on and off the mercury lamp. Mosaic The system is equiped with a motorized stage. This gives you the possibility of scanning larger image areas and combining the images into one large image. Motorized stage x-axis inversion Zeiss ApoTome The Zeiss ApoTome uses structured illumination to remove blur arising from out of focus fluorescence signal. For more information on the ApoTome visit the Zeiss Campus webpages on the ApoTome principle and operation. Changing ApoTome grids Ending your imaging session When you have finished your imaging session you should: • Close the electronic fluorescence light shutter • Log off from the computer • Clean objectives from oil if that was used On working days (Mo-Fr) leave the equipment on if your reservation ends before 16:00 . If your reservation begins before 16:00 and ends after 16:00 and you are not present at 16:00 , please leave Axiovision software on to show that you will continue your imaging session. If your session ends after 16:00 on a working day, or you are using Axioplan on Saturday, Sunday, or a holiday, you should turn off the equipment unless somebody has a reservation after you. You can check that by opening Internet Explorer. The default page of IE shows that day's reservations for Axioplan. When turning off the equipment, the following tasks should be carried out: • Turn off the fluorescence light (by switching off the power supply) • Do not disconnect the camera. The new camera gets its power from the firewire connection to the computer and will turn off when the computer is turned off. • Turn off the microscope and computer • Cover the microscope (not the lamp housing; see the image below). NEVER cover the lamp housing with the dust cover, or let the cover to touch lamp housing as it is very hot even long after it has been switched off. • Write down the time in the paper calendar. This is important because once the mercury lamp is switched off, one needs to wait for 30 min before turning it on again.
Page updated 21.10.2016 |
||||||||||||||||||||||||||||||||||||||||||||||||||||||||||||||